How to: Betta Fish Photography
Selling fish online is all about standing out among the crowd to attract buyers, and the best way to do so is by using clean, flattering photos of happy, healthy fish. Photos that are flattering to the fish increases your visibility but also helps with your overall reputation as a store. We have all seen ads of unhealthy-looking fish that use grainy photos and water that appears unclean; it does not inspire much confidence in the health of the fish or the overall husbandry of the keeper. This can prove challenging, however, for species like betta, where some may choose to photograph each fish individually. Capturing photos of each fish that is appealing to the eye is no easy task, but I’ve spent hours troubleshooting to compile some tips and tricks to capture great betta photos every time.

To highlight bettas in particular, you’ll want to consider several factors for your Betta fish photography. There has been a standard set over the years of online fish selling on what the ideal ad photos look like for bettas. Form and color presentation of each side of the fish, with clear conformation shown off by flaring. Buyers want to see the fish they are purchasing with the most accuracy to real life, so you’ll want to avoid oversaturating colors, or hiding form faults in sale photos.
Setting up a dedicated space for betta fish photography allows you to control lighting and clarity. Use a container with straight surfaces to prevent warping the fish’s appearance. Clean the container and use a solid background to help your fish stand out and assist your camera in focusing. Bright overhead lighting will bring out detail and accurate color.
Betta Photography Tank Set-up

My personal photography tank consists of the following.
- 2.5 Gallon Rimmed Tank (Purchased from Petco)
- 10-watt Heater to keep fish comfortable and colorful
- A piece of black or dark colored paper
- 2 pieces of white paper
- Aquarium LED Light
- Ring Light (optional)
- Airstone
- Dechlorinated pre-heated water
- Piece of clear acrylic, .7mm cut to divider size
- Thermometer
My Process
Ideally, I set up my betta fish photography tank a few hours in advance, which lets sediments settle, and the water comes to the appropriate temperature. I add an airstone to the water to agitate it slightly, which can help prevent air bubbles from attaching to the glass; some bubble removal will always be necessary due to the nature of a freshly filled tank, however. They can be removed with a sponge or brush. I add Prime and Stress Coat to my photography tank to ensure the water is safe. (You should never put your fish in untreated water, even for a quick photo session.) For a background, I use simple construction paper and white pages on the side planes to act as a light reflector, essentially creating a mini photo box. Overhead, I use a simple white LED panel, and if I’m taking photos of a darker colored fish, I use a secondary ring light.

The easiest way to entice your fish to flare is to allow them to flare with another fish, to provide a space for them to do so. I use a clear acrylic sheet cut to size. You may choose to permanently mount this to your tank with aquarium-safe sealant, but I cut my acrylic to fit snug so it can be removed, but is not easily pushed over by large fish.
Once my tank has settled and I’ve matched the temperature of the water to the temperature my bettas are kept at, I introduce fish into either chamber. I allow a minute or two for the fish to settle if they need it, but most get to flaring at one another quickly once they realize they can see another betta. I take a moment to watch the movement patterns each fish is displaying, so I can time my pictures better. Try to take photos when the fish are still, and use a “burst” setting to take multiple captures.
Important note: Watch your fish for signs of stress when flaring with another fish. Don’t allow flaring sessions to last more than necessary. If your fish go into avoidant behaviors, hide with their fins clamped, or seem generally uncomfortable, remove them. Fish subjected to long periods of flaring/sparing when they are unconfident or scared can make them more fearful in the future. Keep the comfort of your fish at the forefront of your mind.
Choosing the Right Photos
When choosing photos for your advertisements, look for photos that clearly show each side of the fish, their patterns, scales and details of their fins. Avoid photos that are grainy, blurry, warp the fish or are at an unflattering angle.

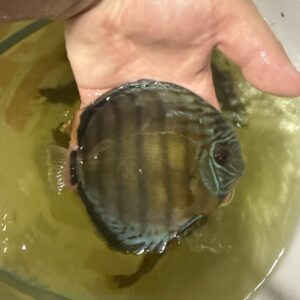
In this example, you can clearly see the fish’s scale pattern, details to the edge of the fin, and body confirmation. The coloration of the fish has not been edited to be oversaturated or altered. Filtered photos, videos with effects, and things of the sort are fine to post at your leisure on social media, but you should avoid using them for advertisement photos.

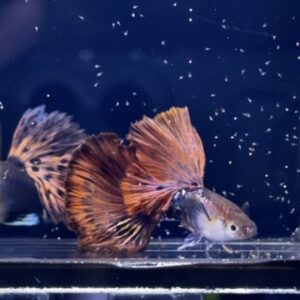
In this example, this fish has just been released into the phototank and is adjusting to the overhead lighting. It is clearly uncomfortable with its fins unextended. A photo like this may not inspire much trust that the fish is healthy.
Betta Fish Photography Examples!!!


Setting Up Your Camera
Using a high resolution camera with a macro lens is the easiest way to get clear, beautiful photos, but it is not the only option. I’ve taken as much media with my iPhone as I have my Canon Rebel. Using your betta fish photography tank as a dedicated space will improve your photos substantially, but knowing how to set up your camera to work for you will only further improve them.
If you do not have access to a camera or your phone settings do not allow for much customization, you will likely have a better shot at capturing clear and eye-catching photos by taking stills of video. Phone cameras often try to condense photos, resulting in over-saturation and hardness that can make photos seem grainy or out of focus. I have an iPhone 15 Pro. I find I get the best photos and videos using the cinematic feature and turning the auto focus off. (A small f symbol in the corner of the screen). I take a 30-second video and scroll through the video to screen capture the fish as they move around the tank.

When using my Canon Rebel EOS T6, I use manual settings, and I have a general range that I follow depending on the color of the fish and how the lighting behaves that day. I find my ISO ranges the most as it is largely dependent on the lighting. I use a standard 55mm lens, but a macro lens is also helpful when getting highly detailed photos of your fish.
Betta Fish Photography – Example Camera Settings
General Settings:
- Shutterspeed: 1/100- 1/800
- Aperture: f/5.6 – f/29 (Depending on the color of the fish)
- ISO: Varies

- Shutter speed: 1/320
- Aperture: f/5.6
- ISO: 1600

- Shutter speed: 1/200
- Aperture: f/5.6
- ISO: 800

- Shutter speed: 1/640
- Aperture: f/6.3
- ISO: 1600
Quick Tips For Betta Fish Photography
- There will always be little floaters in your water column that flashback in your photos. Photoshop is your friend if you intend to make a print of your photo.
- Study other breeders/shops’ photos for inspiration. Try to find similar morphs and tail types to your fish.
- Try to keep your colors as true to real life as possible. Keep in mind screens will always alter colors, but try to balance your lighting to keep them as true to real life as possible.
- Get pictures of both sides of your fish, and keep your fish’s pictures current. Especially if your fish have gone through color changes or further maturation.
- Don’t take photos of sick fish or fish in recovery. If you’ve just received a shipment of fish, allow for some days for the fish to settle. Happy fish make for good photos.
- Use a tripod or something to steady your phone or camera for crisper photos.
- Using flash can also increase photo clarity, but be mindful of your fish’s vision